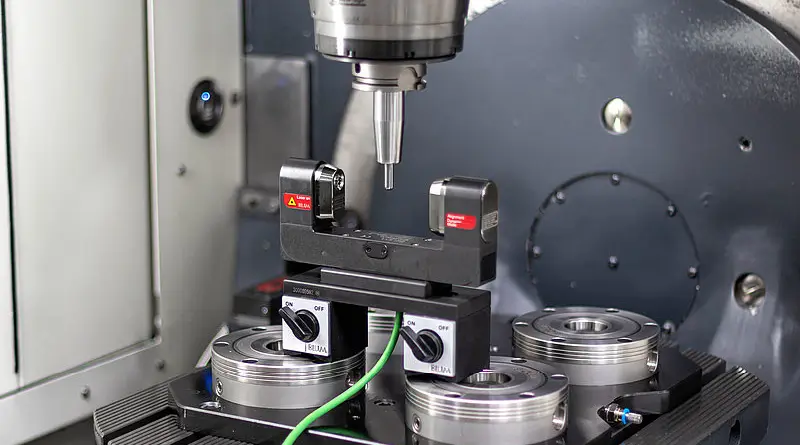
What is machining runout: the answer
Machining runout is a machining term that refers to manufacturing errors that occur specifically on rotating power components. Since nearly every industry relies on machinery such as pumps, gears, shafts, etc., runout is undoubtedly an important error to be aware of.
In this article, we will cover the definition of machining runout, the types of machining runout: radial runout and axial runout, runout management in GD&T, and some tips on how to measure machining runout.
1.What is machining runout?
Before we dive into the details, let’s quickly review the general runout definition. Runout is a specific type of manufacturing error that applies to rotating components such as motor shafts.
It measures the deviation of these components as they rotate around a fixed reference axis. Ideally, the axis of the component and the reference axis should be co-linear, but in reality, this is not the case.
In simple terms, machining runout is a measure of how much a rotordynamic component wobbles. Understandably, this is an undesirable error that must be controlled. If the machining runout in the process is out of range, it can lead to catastrophic problems such as bearing failure or permanent shaft bending.
2.Two Types of Machining Runout
Now that we have discussed the definition of machining runout, let’s explain its two types: axial runout and radial runout.
1) Radial runout
Radial runout occurs when the axis of a rotating component deviates from the axis of rotation. In this case, the axes are still parallel, but not colinear.
Imagine a drill bit held in a chuck slightly off center. It will rotate with the chuck, but not about its axis. Instead, the axis of rotation will be the center axis of the chuck. In this case, the drilled hole will be larger than the drill size by an amount equal to the radial runout.
2) Axial runout
Axial runout is defined by the angle between the component axis and a reference axis. In this case, they are not parallel to each other. Due to the angle, the deviation between the part and the reference axis becomes larger the farther away from the intersection of the two axes.
A good example is a loose car tire. You can see its wobble from the back. As we just explained, the wobble is less severe close to the axle, while it is more noticeable at the circumference of the tire.
3.Machining runout in GD&T
Geometric dimensioning and tolerancing (GD&T) is a complex system used to describe the relationship between engineering tolerances and parts. It serves as a manufacturing guide and quality assurance standard. Since rotary machines are so common, all GD&T systems offer this feature.
According to the ASME Y14.5 standard,machining runout in GD&T is controlled by the runout symbol shown below. This is a 2D feature that is used to establish a circular tolerance zone centered on a reference axis. GD&T experts also use the term “datum axis” to represent the reference axis. All points on the control surface must lie within this tolerance zone for the part to pass the necessary quality checks.
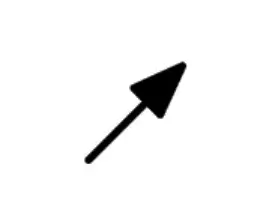
A 3D version of runout is also available. If the total runout symbol is called on a circular surface, the entire surface must be measured and should lie within the 3D cylindrical tolerance zone.
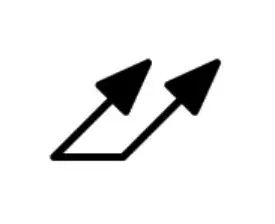
These two symbols, the runout symbol and the total runout, are effective tools used by design engineers to communicate their manufacturing requirements for production and quality.
To drive the point home, we will demonstrate the use of the runout symbol with a simple example.
4.GD&T machining Runout Example
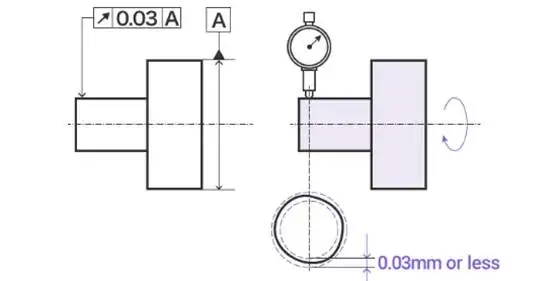
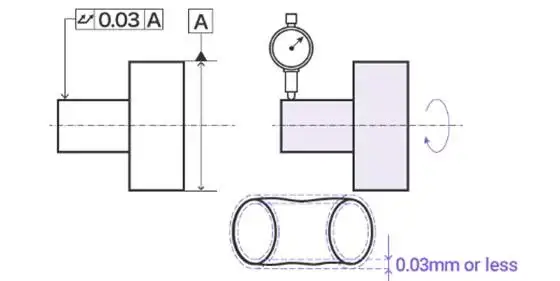
It is very easy to deal with runout in GD&T. First, let’s look at the runout symbol example shown below. The runout is indicated on the smaller cylindrical surface as indicated by the arrow next to the callout.
The “A” in the callout refers to the datum feature, which is the axis of the larger cylinder. The 0.03 value is the radial runout tolerance. The image to the right shows the measured value along with the +/-0.03 tolerance zone. The measurement shows that the profile (solid black line) is within the tolerance zone (dashed line). So, all is well!
Next, we’ll discuss the total runout symbol. Let’s expand on the previous example by replacing the runout symbol with the total runout. The image below reflects this change.
The measurement is the same as before. However, this time the tolerance zone is a 3D cylinder. The entire surface of the smaller cylindrical feature must fall within this tolerance zone. Therefore, the technician will take multiple measurements at different locations along the axis of the feature. This requires a little extra work, but imposes a tighter tolerance on the geometry.
5.How to Measure machining Runout: Step-by-Step Instructions
The GD&T example above discussed runout measurement. In this section, we’ll answer the question: How do you measure runout?
The micrometer is by far the most commonly used measuring device for radial and axial runout. The micrometer is intuitive to use and easy to set up. In addition, the micrometer is very accurate and the measurement results are repeatable.
A step-by-step summary of the measurement process is as follows:
1) Secure the datum
Referring to the above example, this means firmly mounting the datum (large cylinder) in a rotating device such as a chuck or spindle. By doing this, you ensure that the datum itself does not wobble during the measurement process.
2) Mount the micrometer
Use a fixed reference frame. For example, the floor.
3) Press the pin against the feature
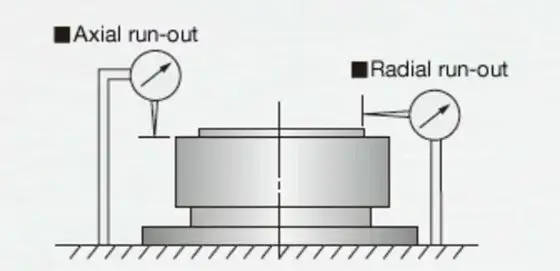
Set the micrometer in a convenient position and gently press the pin against the surface being measured. For radial runout, this is the circular surface. For axial runout, place it on a surface perpendicular to the center axis. Refer to the axial vs. radial runout diagram for a clearer explanation.
4) Zero the dial
On a standard micrometer, you rotate the micrometer frame to set it to zero.
5) Take the measurement
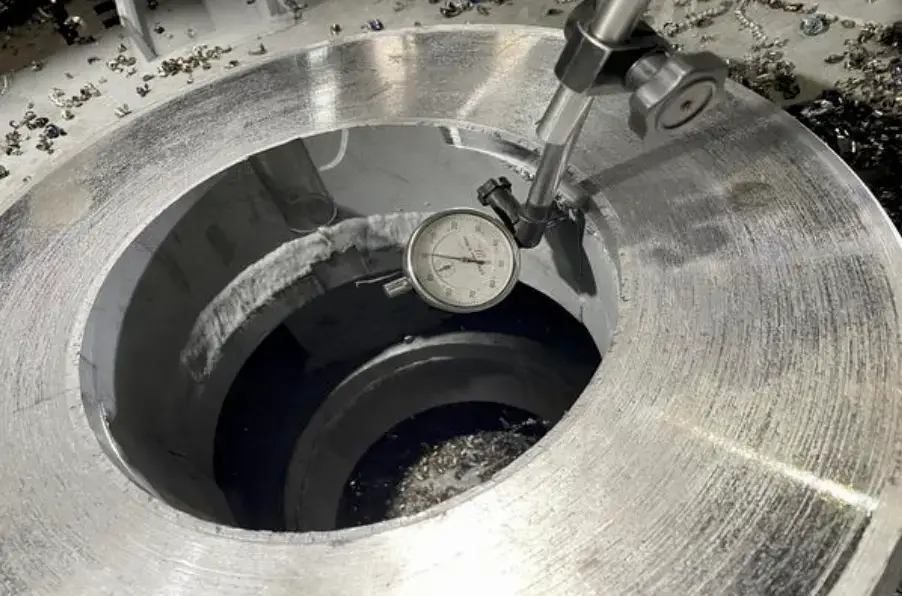
Turn the part one full revolution and record the deviation seen on the micrometer. Furthermore, you can repeat the process several times to minimize errors.
In addition to micrometers, engineers widely use modern measuring tools such as laser measuring instruments or coordinate measuring machines (CMM) for high-precision applications. These machines are automated and can measure errors with greater precision.
6.Why is avoiding machining runout important in manufacturing?
Like all manufacturing errors, there are applications where avoiding machining runout is critical. Typically, machining runout is important for machinery such as motors, shafts, pulleys, flanges, gear shafts, etc.
One key reason to avoid machining runout is chatter. The runout of a rotating component causes it to vibrate around its axis, creating centrifugal forces and unwanted motion. This vibration increases with the amount of runout and the rotational speed.
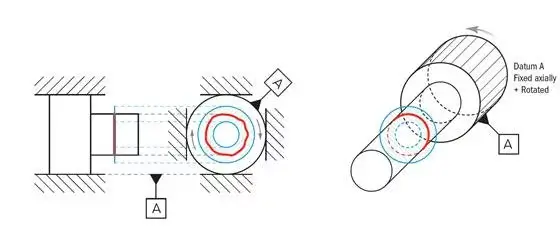
In extreme cases, this vibration can damage the entire assembly, causing permanent deformation of parts, exciting dynamic modes in the assembly, and reducing the fatigue life of the assembly.
Furthermore, another reason to avoid runout is motion accuracy. Imagine a car with wobbly wheels. The runout of the wheel creates a safety hazard and will definitely damage the car. Therefore, for a smooth and safe ride, the total runout must be minimized.
Runout in machining is another important issue. Many machining operations involve rotating tools. For example, turning, milling, and drilling. If the tool is not mounted correctly (excessive runout), the operation will produce inaccurate results. In addition, damage to the tool and the machine will occur.
7.Conclusion
Precision manufacturing is all about optimizing your process to minimize errors. It is directly related to industrial productivity and quality. For rotating parts,machining runout error is the most important consideration, and rotating parts are the lifeblood of modern industry. Needless to say, controlling machining runout is only a small part of the manufacturing industry’s move toward ultra-precision manufacturing.
Want to avoid machining runout errors in your projects? Xavier‘s precision machining services provide you with high-quality machined parts. Our machinists are equipped with 3, 4, and 5-axis machining centers to meet your various machining needs with expertise.
