Why are machining tolerances so important in manufacturing?
The processing of machining tolerances is a rigorous and complex task that mechanical designers and manufacturers must pay close attention to. At present, as the market’s requirements for product quality continue to rise, machining tolerances have become a key parameter that must be carefully considered in the product manufacturing process. It is an important guarantee to ensure that the product remains consistent at the micro level.
1、Definition of machining tolerance
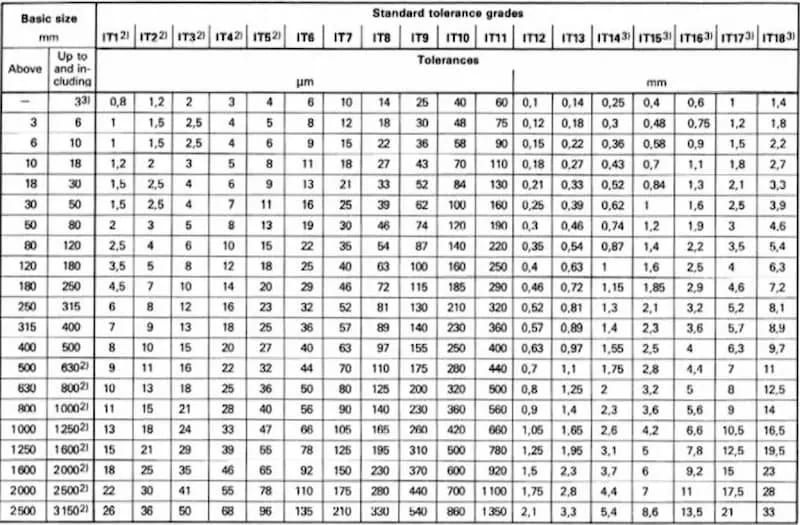
Machining tolerance refers to the range of geometric parameters allowed to vary during machining. It is an intuitive reflection of the precision requirements for part manufacturing and also reflects the difficulty of machining. Generally speaking, the smaller the tolerance value, the higher the precision of the part. However, in actual machining operations, there is no perfect process without errors. Even if modern manufacturing technology continues to develop and the tolerance value has been reduced as much as possible, it will never reach zero.

2、Explanation of terms related to tolerance calculation
1.Linear dimensions
Linear dimensions are mainly divided into two categories: linear dimensions and angular dimensions. Among them, linear dimensions refer to the distance between two points, such as diameter, width, height, depth, thickness and center distance.
2.Nominal dimensions
Nominal dimensions are dimensions determined at the product design stage, and they are the basis for subsequent dimension calculations and processing.
3.Limit size (limit size)
The limit size is the two extreme values of the allowable size of a hole or shaft. The larger limit value is called the upper limit size (Dmax), and the smaller one is the minimum size (Dmin).
4.Actual size (actual size)
The actual size is the size measured after the part is processed. Because there will be errors during measurement, the actual size measured is not the real size. The nominal size and limit size are given during design, and the actual size is between the upper limit size and the lower limit size.
5.Dimension deviation
Dimension deviation is the algebraic difference between a certain size (such as limit size, actual size) and the nominal size. This algebraic difference can be positive, negative or zero, and the deviation value must be preceded by a positive or negative sign. Deviation is divided into limit deviation and actual deviation.
Upper limit deviation = upper limit dimension – nominal dimension
Lower limit deviation = lower limit dimension – nominal dimension.
6.Dimension tolerance
Dimension tolerance t (that is, the variation range of qualified actual dimension) = upper limit tolerance dimension – lower limit tolerance dimension. Because the upper limit dimension (deviation) is always larger than the lower limit dimension (deviation), the tolerance is an unsigned number and cannot be negative or zero.

3、Types of Tolerance
1.Dimensional tolerance
It refers to the amount of change allowed in the size, that is, the absolute value of the algebraic difference between the maximum limit size and the minimum limit size. This type of tolerance is directly related to the accuracy and range of variation of the part size.
2.Shape tolerance
This is the sum of the allowed changes in the shape of a single actual element, covering six aspects: straightness, flatness, roundness, cylindricity, line profile and surface profile.
3.Position tolerance
The sum of the allowable changes in the position of the relevant actual elements relative to the reference. It can limit the relative position relationship between two or more points, lines and surfaces of the part, including parallelism, verticality, inclination, coaxiality, symmetry, position, circular runout and total runout. Accurate position tolerance can ensure the accuracy and overall performance of parts during assembly.
4、Points to note when using tolerance
When dealing with machining tolerances, proper planning in advance can effectively utilize resources, reduce the error rate of finished products, and improve work efficiency. However, the smaller the tolerance, the better. The smaller the tolerance, the higher the precision requirement and the higher the cost. The tolerance should be determined according to the actual needs of the parts.
When controlling strict tolerances, special attention should be paid to the following points:
1.Cost
Based on the prototype and usage of the designed part, map the relationship between cost increase and tolerance zone decrease, find the critical value that meets the acceptable range of the specific project, and then adopt the minimum machining tolerance that fits the budget. This can not only meet the basic requirements of the product, but also achieve optimal cost control.
2.Inspection
After the product is completed, it enters the quality inspection stage, which is to determine whether the final product is qualified. If it is not qualified, it will be rejected. Depending on the strictness of the machining tolerances, the time for the quality inspection phase is different. The stricter the tolerances, the higher the time cost and the more complex the testing equipment required.
3.Processing technology and methods
Different processing techniques require different mechanical equipment, and these equipment have a significant impact on the machining tolerances of parts. Since some parts need to go through multiple different machines during processing, it is necessary to understand the tolerance levels of different machines in detail and adjust the processing sequence in a planned way, so that the tolerances of the finished product can be effectively controlled.
4.Surface roughness
The surface of all products has roughness distortion, and different materials have different roughness. So when choosing tight tolerances for CNC machining, existing surface roughness conditions must be considered. If tight machining tolerances are the goal, rough surfaces will cause trouble and may affect the final quality and accuracy of the product.

5、Conclusion
Machining tolerances are of great significance in the manufacturing industry. They are related to the quality and consistency of products, and each one affects every link of production. Only by correctly understanding and controlling machining tolerances can we ensure quality while taking into account cost and efficiency, and achieve sustainable development of the manufacturing industry.
If you need to manufacture custom parts with reasonable tolerances, Xavier can better help you. Xavier is a CNC machining service provided by an experienced team of experts and the most advanced machines and equipment on the market. This means that you not only have the best tolerances recommended by professionals, but also the best equipment to achieve these tolerances in actual production.
